


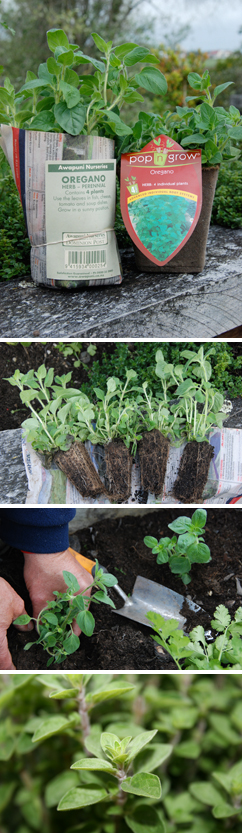
Oregano is super easy to plant. Got a corner in your vege garden that looks a bit empty? Simply dig a little hole and plant your oregano seedling. You don't even have to wait for oregano to grow to harvest from it, although I would advise against doing that. If you let it get established before you start picking it's leaves it won't just be a one hit wonder of a herb.
And that's it. My gardening advice for this month has been dispensed.
If only it were that easy - for me that is. If you've been reading my articles for the last five or more years you'll know I can't just stop there. I have an endless supply of 'Tod's top tips', as I like to refer to them, to dole out.
So, given oregano is so easy to plant I thought I'd mix up this month's article with a few hanging basket tips too. You can't go wrong with a good hanging basket. And you can't go wrong with giving a good hanging basket this Christmas. Got kids? Get them involved in the planting.
Head down to your local Bunnings or the Warehouse and grab yourself a basket and a plastic saucer to fit in the base. If you want to have plants growing out the side of the basket (what I'd recommend) purchase some sphagnum moss and a basket with small spaces in between the wires (so the moss won't fall out the sides). If you'd rather just plant the top of the basket like you would a pot - grab a basket with a coconut fibre inside.
Make sure your basket has a diameter of at least 350mm wide. In my opinion, the bigger the basket, the better. A large one will retain more water, which means it's less likely to dry out.
While you're out, get some seedlings to grow in your basket. Of course, I'm going to recommend growing oregano in it. But why not add some parsley, thyme, basil or cherry tomatoes in the middle? You could even add strawberries to the sides. They take up very little room and the basket allows them to stay clear of the ground - which makes it harder for pests to get them.
Once you've got your tools and seedlings it's time to get started. I like to place my basket on top of a bucket so the round bottom doesn't rock around while I work.
Speaking of buckets, it's a good idea to soak the sphagnum moss in a bucket of water. It's a natural sponge - which means it will soak up water and provide the plants with ongoing moisture. Plus it stops the soil falling out!
Once your moss is damp, place it along the bottom of the basket and approximately 50mm up the sides. Next, sit the plastic saucer on top of the moss and pour in potting mix until it reaches the same height as the moss.
I like to use a slow release fertiliser because it will feed the plants for up to four months - until I re-do the baskets for winter.
If you're growing plants down the side of your basket now's the time to lie their roots across the potting mix and poke the top of the seedlings and leaves through the sides of the basket.
Then add another lay of moss over the top. This time place the moss 100mm up the insides of the basket.
Add another layer of potting mix and seedlings, put another layer of sphagnum moss down and take it all the way up the insides of the basket.
Fill the container to the top with potting mix. (If you're using a basket with a coconut fibre this is where you join in.) Now, simply plant your other seedlings.
Once you've finished your basket, tie a big ribbon around it and you've got the perfect gift. And that's it. I'm really finished this time.